May 2019
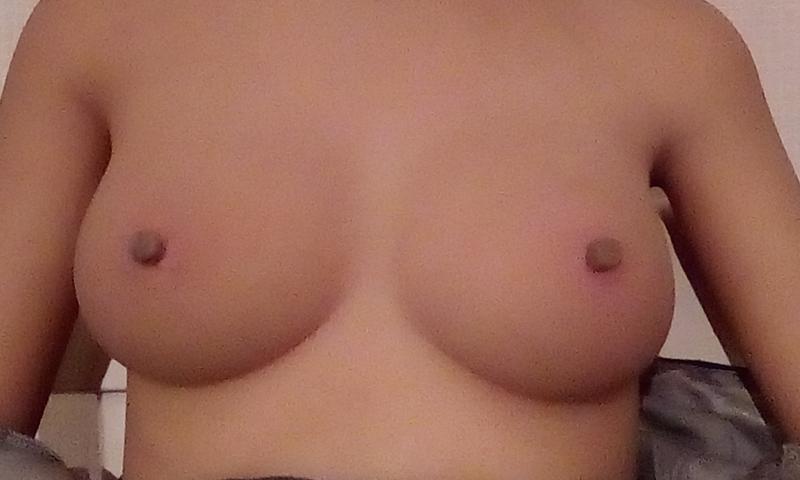
I think it began to happen when Elina and I started sleeping together. One morning when I got out of bed I noticed something on the sheet between us. I picked it up, looked and felt it. It was soft and squishy and sort of triangular in shape. I had no idea what it was, what I did know was its source…Elina. I studied her body, at first I couldn’t see anything wrong. Eventually I did, the top of her left nipple was missing. Over the next month or so her nipples began shredding from the areola and rose up the nipple. They looked like closed cup mushrooms, within a few months they were both gone. I contacted the manufacturers of her and also several other doll manufacturers seeking help, suggestions and the materials I would need to effect a repair. The manufacturers of her emailed me back stating that my email was too long and their English ‘no good.’ One other company emailed and were quite helpful for three of those, then pulled out in the fourth. We were on our own. I needed to think about how to repair her.
Aug 8 2020
For quite a while Elina has been nipple-less and for over a year I have been trying to find an alternative that would work. I had investigated the false nipples/areola that are sold on Eb & Am for women to wear under their clothes, eventually the small pair I had ordered arrived. The areola was far from small being 60mm with a 15mm diameter nipple and they were silicone. On the plus side the colour was something I could live with.
To cut a long (and exhausting) search short, eventually I found a new (to me) product that seemed to be ideal, so I placed an order. Whilst I waited I started doing research on female nipples and found some interesting facts.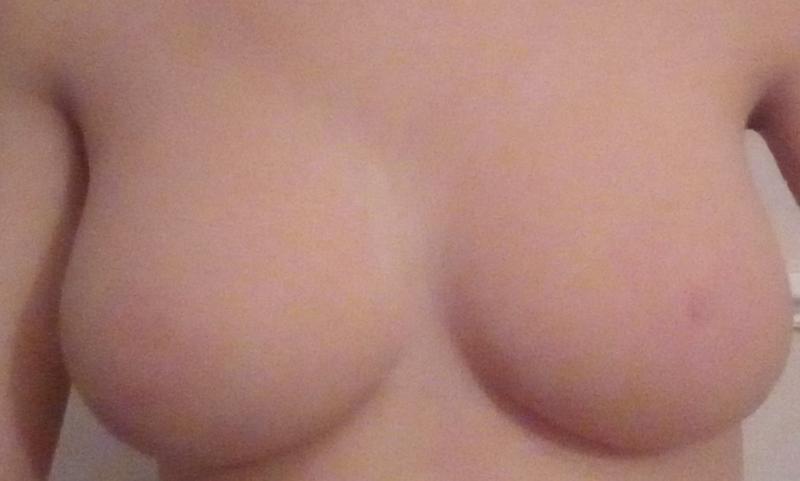
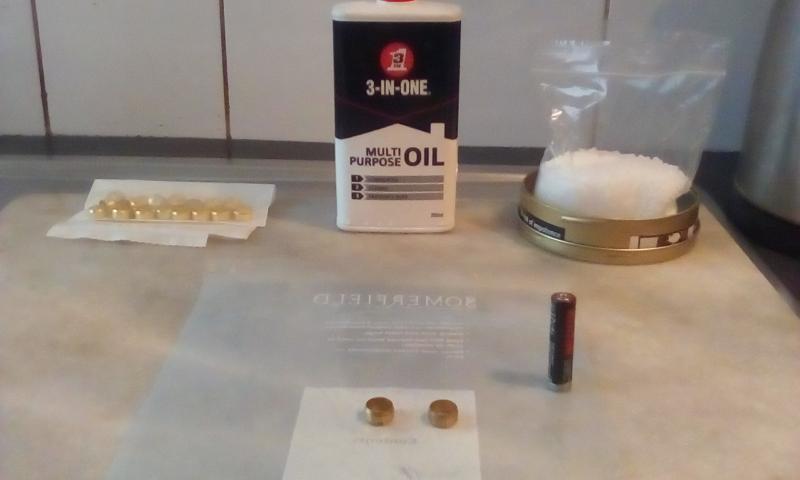
Nipolgy: The average size of an areola is 30mm, the average diameter of a nipple is 10mm and the average colour is a dark reddy pink.
Creating The Nipples (first pair)
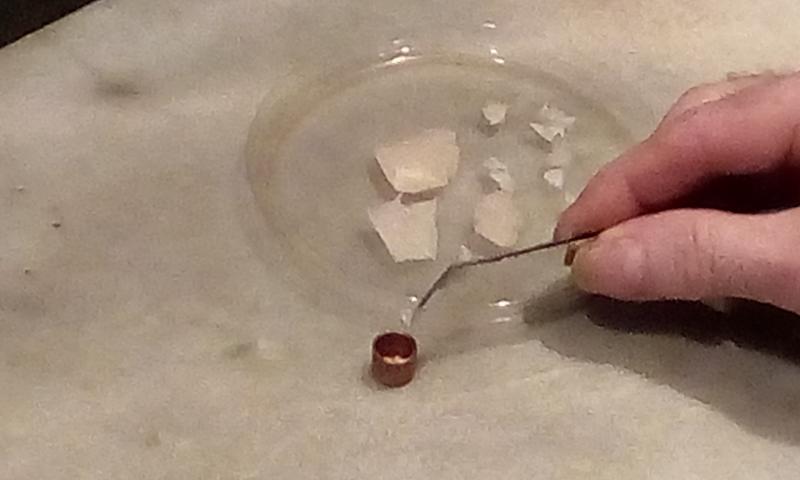
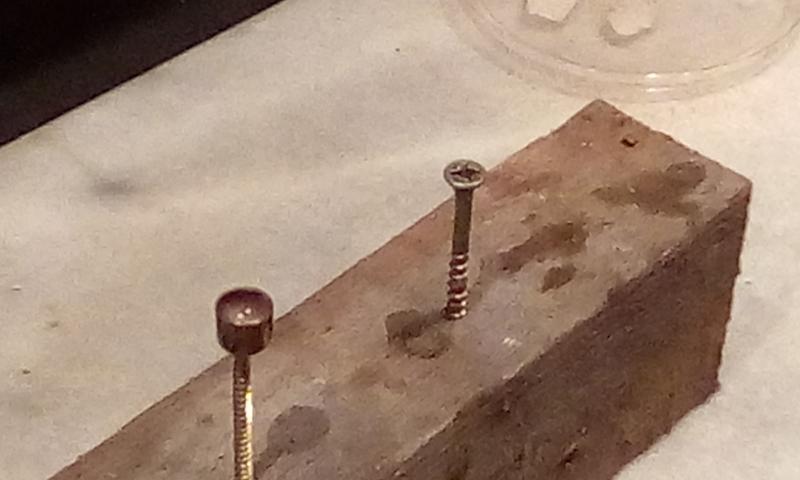
The product is a granulated plastic that you soften in boiling water. Although you cannot pour it into mounds, you can compress it. For the mould I’m using 10mm olives (10mm is the diameter of pipes used in microbore central heating systems), with the plastic compressed by a AAA battery (also 10mm diameter).
Later on she asked me if I would kindly give them a fondle, which I did. It felt nice to feel a nipple there after so long without. When we went to bed I’m not going to describe how nice it felt to feel a pair of nipples again against my chest, I’ll let you imagine that bit.
After a few days I had some concerns, they were too rigid and I didn’t want to risk any further damage to the remaining tpe on the areola, even though I had used a rather special adhesive. A rethink was called for. Inspiration soon came following a tidy up in the dining room. I picked up the protection Elina uses on the back of the dining chair, a piece of pipe insulation, and placed it in the box where it lives. A seed of an idea was germinating in my mind. Later, on my way to the kitchen for coffee, I picked it up and took it with me. After a clean I smelled it, no smell, licked it, no taste, studied it. It had the texture of skin, both on its face and its edges and the thickness was about right too. I then went on a hunt for some scrap pieces I knew I had…somewhere. Having found one I tried it with some colour, it stayed on. So I assembled what I thought I needed and did a few tests, success soon followed.
Creating The Nipples (second pair)

What you can see in the pic is a 10mm end feed stop end which is held in the pliers as hot air is blasted at it all around. Getting the temperature right is hit and miss. Too hot and the nipple or cylinder shrivels up inside unseen until you remove it, not hot enough it doesn’t penetrate all the way through cleanly. The knife is there solely to hold the insulation in place, the knitting needle was used to remove any insulation that got stuck in the stop end.
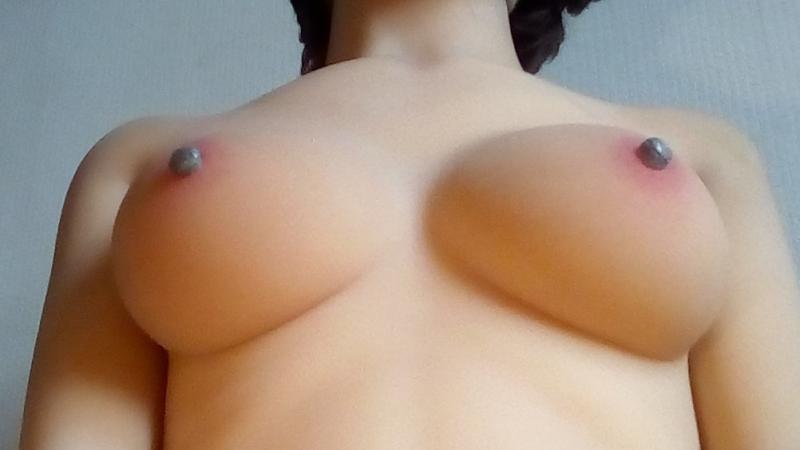
Elina Once Again Got On The Operating Table, After Carefully Removing The Old Nipples The New Ones Were Attached…

…They Can Be Squeezed, Licked, Sucked, Kissed And Even Tweaked…
All Elinas Nipples Were Attached With This Rather Special Adhesive…
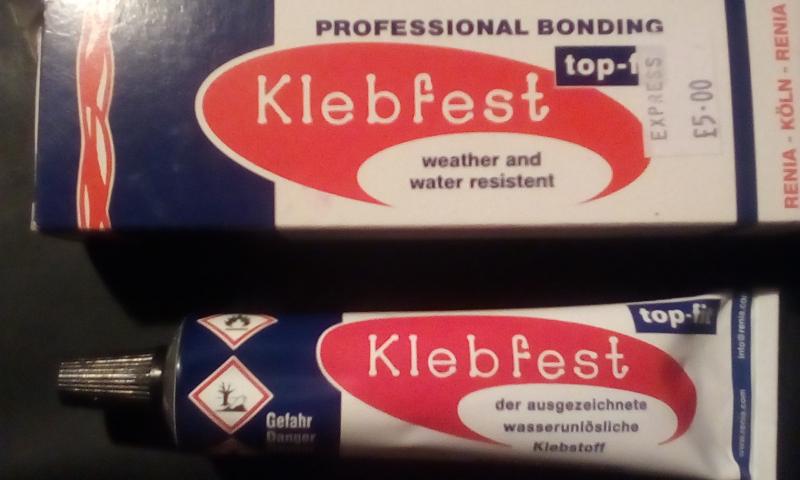
It is a Neoprene adhesive which remains flexible even when set. So if I move too much against her during the night, instead of her nipples pulling against the tpe, the adhesive allows for the movement and takes the strain. Marvellous!
Incidently its main use is for repairing wet/dry suits for divers, air filled dinghy’s (known as ‘Ribs’), vehicle and cycle inner tubes and in the footwear industry (both manufacture and repair) where it is used to ‘cement’ the soles to shoes. No doubt inflatable dolls could be added to the list. The price ticket you see is several years old, I’ve no idea of its current price.
But there is one downside, the heat used to extricate a cylinder of polyethylene foam has somehow altered its structure so that now it will not take any colour…yet. As I said to Elina grey nipples are better than white, she’s not totally convinced.
It took almost another year before any further progress could be made.
Creating The Nipples (third pair)
Jun 02 2021 An offer of a doll skeleton and varies quantities of tpe was made. I sent a private message.
Jun 24 2021
It seemed such an easy plan. We had reached an agreement, for a financial consideration he would send me both nipples with areolae and a quantity of breast material. All I had to do was cut the nipples off, apply a coating of neoprene adhesive. Remove the polyethylene ones that Elina had and replace them. As I said such an easy plan. It didn’t stay that way for long! How to cut the nipples off? If I used scissors, these would compress the soft tpe and the cut would not be straight, it would be curved, instead if I snipped with just the tip this would potentially leave a jagged cut. If I used a scalpel I would have to put some pressure on it to cut, this too would result in a non straight cut as the nipple would twist. My last idea was to use a reciprocating blade as found on electric carving knives. Luckily I have one. Considering this for a few moments I discounted it as the top blade would push while the bottom one would pull, then they would reverse. I reasoned this would probably not give a smooth straight cut that I needed. Also there are only two nipples and I needed both, or rather Elina did. I couldn’t risk any form of cutting without knowing it was going to be totally successful.
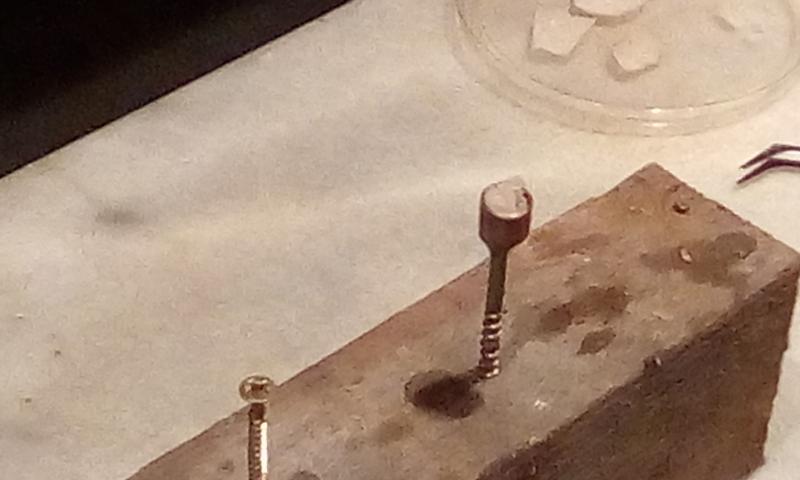
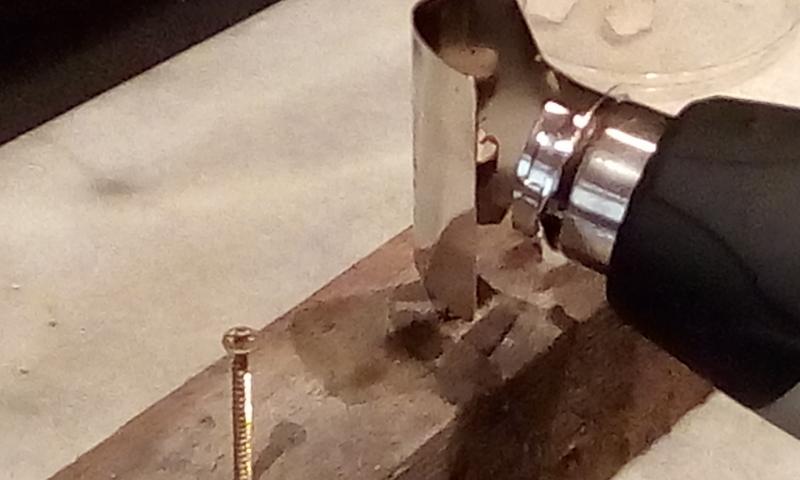
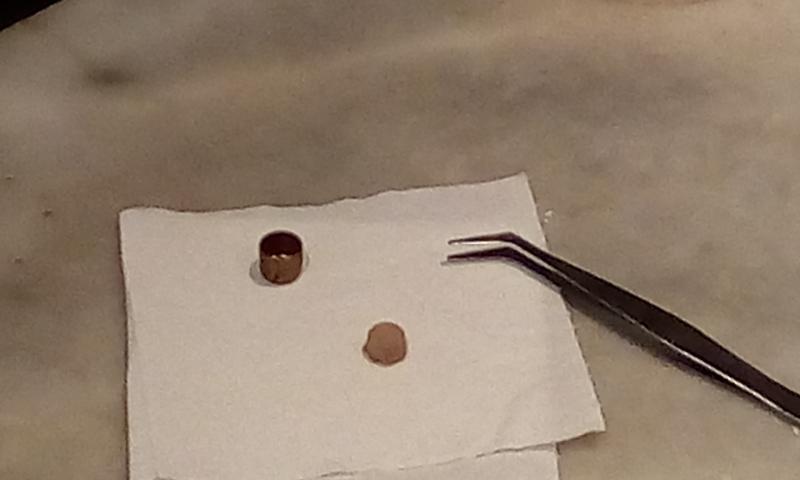
There were two solutions left, one I had some experience with, though not this material. The other, none at all. I picked up the larger of the two breasts and with it upturned in my hand I began shaving the tpe from the back over a fairly large food container. I was wary, I wanted enough but didn’t want to risk shaving off too much. I assembled the pieces of equipment I would need and set to try my idea out. I was going to melt the tpe and mould my own! The first task was to cut the shavings of tpe into miniscule pieces and place these into the copper 10mm stop-end, layering them carefully to avoid air gaps, or resulting in trapped air during the heating/moulding stage. Once filled I then mounted it on a screw set in a block of wood for two purposes, one, to allow the hot air to travel around it easily and two, the screw head would act as a heat sink. With the heat gun set to its lowest setting 450 degrees C and slow fan speed I lowered it slowly over the stop-end. When I noticed the top layers of tpe soften and begin to melt I lowered the gun down so the heat was over the whole stop-end. As soon as I noticed the tpe at the top bubbling, indicating that the air inside was escaping I got ready to remove the gun. When the bubbling stopped I removed the gun, then I allowed it to cool for a few seconds before placing the still hot stop-end on the other screw to continue its cooling.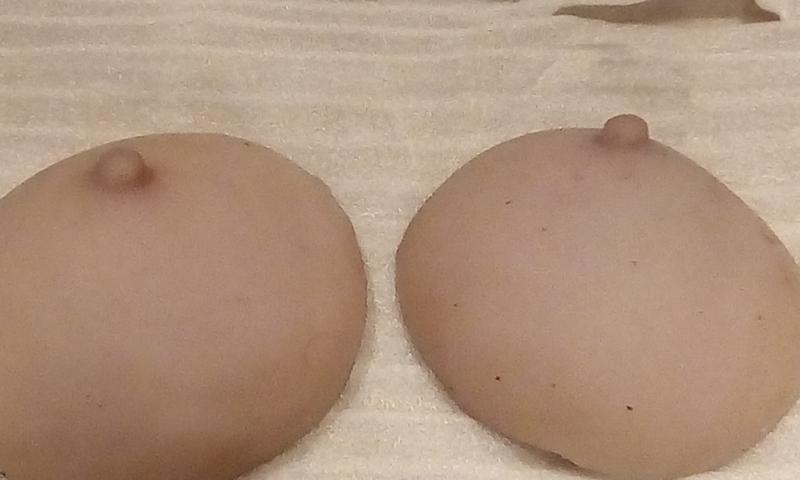

Once cool I separated the tpe from all around the side of the stop-end with an unfolded paper-clip and removed the moulded nipple. When removed I discovered that they were very sticky, once washed in warm water with shower gel, rinsed and dried, the stickiness was gone.
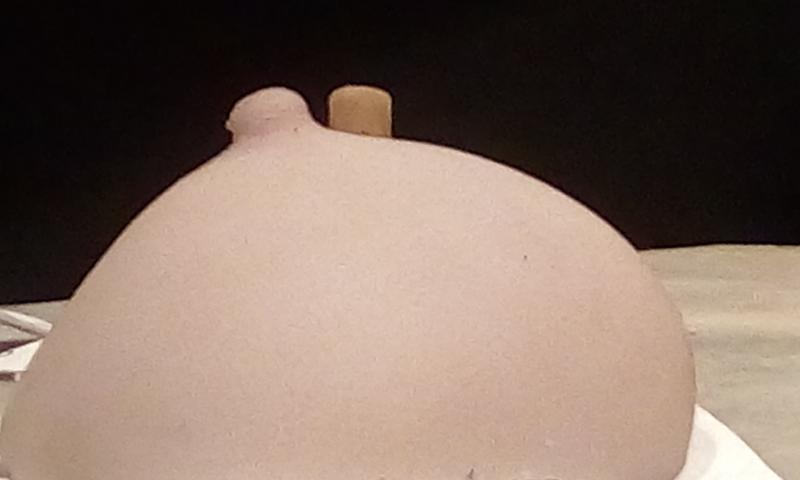
Pic of one of the new breasts showing the original nipple and the newly moulded one.
Elina with her nipples removed…
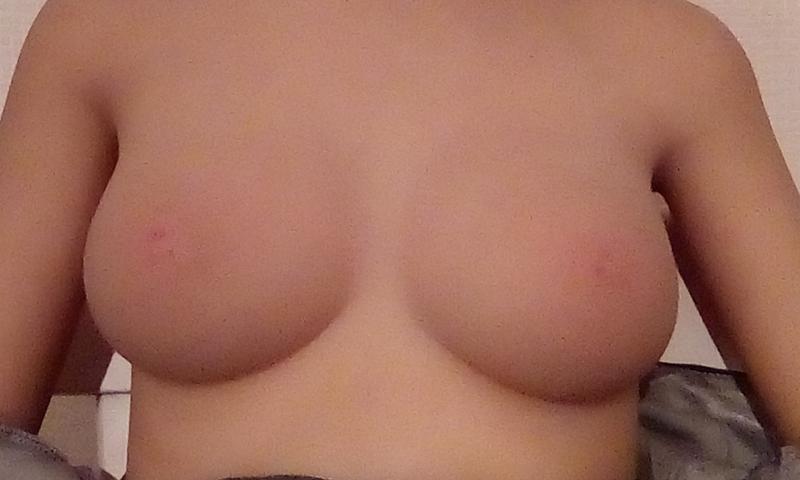
…then replaced…
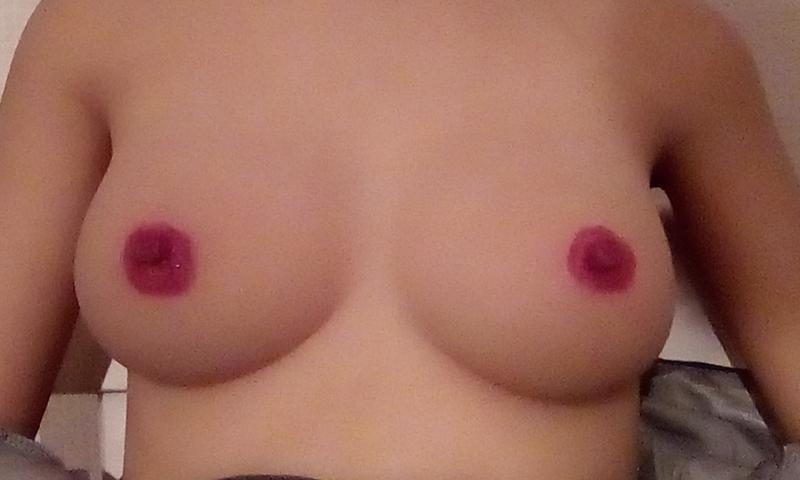
…add a touch of colour (one of the many wrong ones!)…
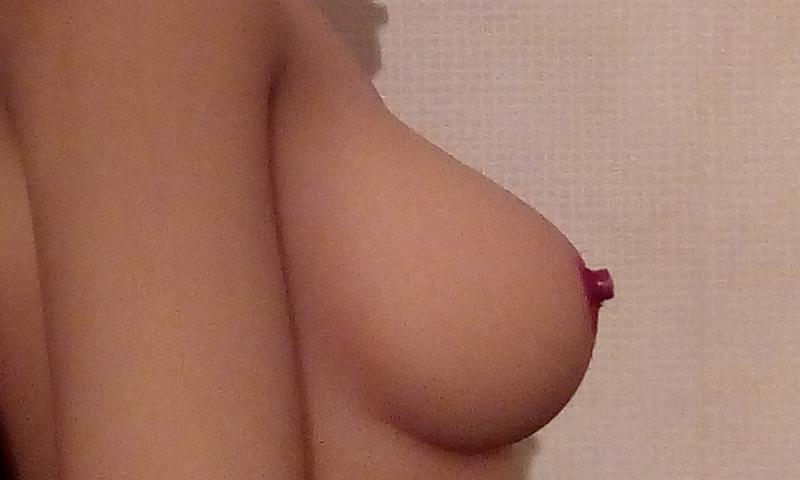
…and a side view.
Finally Elina with her old nipples.

Notes:
The first pair I moulded were dark grey in colour, not the off white of the tpe. I originally thought this was due to the fact this was the second moulding of this tpe, however each further moulding got lighter. I then reached the conclusion that it had nothing to do with the tpe. It was the dirt or rather oxidisation inside the copper stop-end. If I was going to use it for its original purpose, I would have cleaned it with some wire wool, coated it with flux and placed it over the cleaned end of pipe, heated it, and as the flux melted it would collect all the dirt, then as the solder was introduced it would push the flux containing the dirt out. Although I could coat the inside of the stop-end with flux, heat it and turn it upside down to drain, I could not be sure that all the flux would be removed, furthermore I wasn’t aware of what chemical would remove the residue and if it was safe for tpe. So I decided to continue as before.
When I moulded the nipples from plastic I used an AAA battery to compress the hot pellets into the mould. I didn’t use one this time as the tpe would be hot and sticky, and most likely would adhere to the raw aluminium of the battery casing and could potentially pull the tpe out when the battery was removed.
For some reason not all the mouldings were successful. One had the top corner missing, similar to what had happened to Elina’s left nipple during our first week together. Another had the interior moulded in two separate sections, yet the outside ‘skin’ was perfectly formed.

In conclusion I have established that it is possible to do simple moulding of tpe using heat to melt it into a liquid. However before you start on this course of repair you must decide how or from what you will use as the mould. Brass, copper and aluminium are all relatively cheap however they will never be totally clean. In my opinion I would ideally use stainless steel, but stop-ends in any size are not made from this material.
I stated earlier that I had two solutions, this was the first. The second was to use the Xylene tpe solution in the moulds. I shall try this at a later date, results to follow to determine which is the best method of ‘replacement part production’.
Regards
SJL